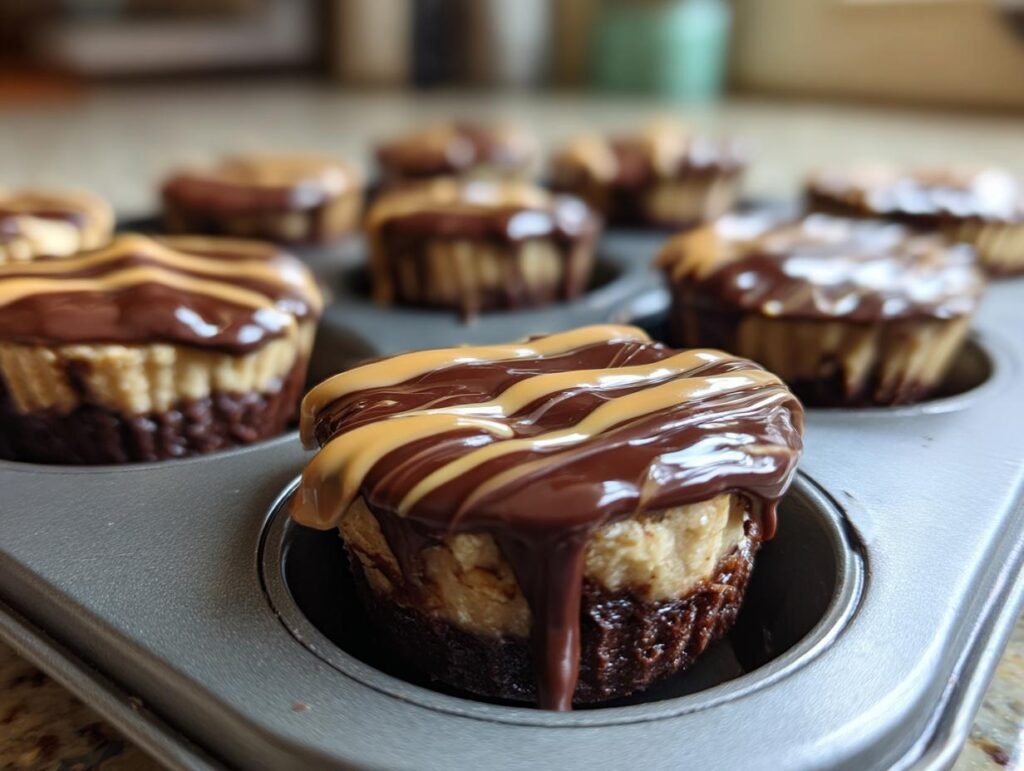
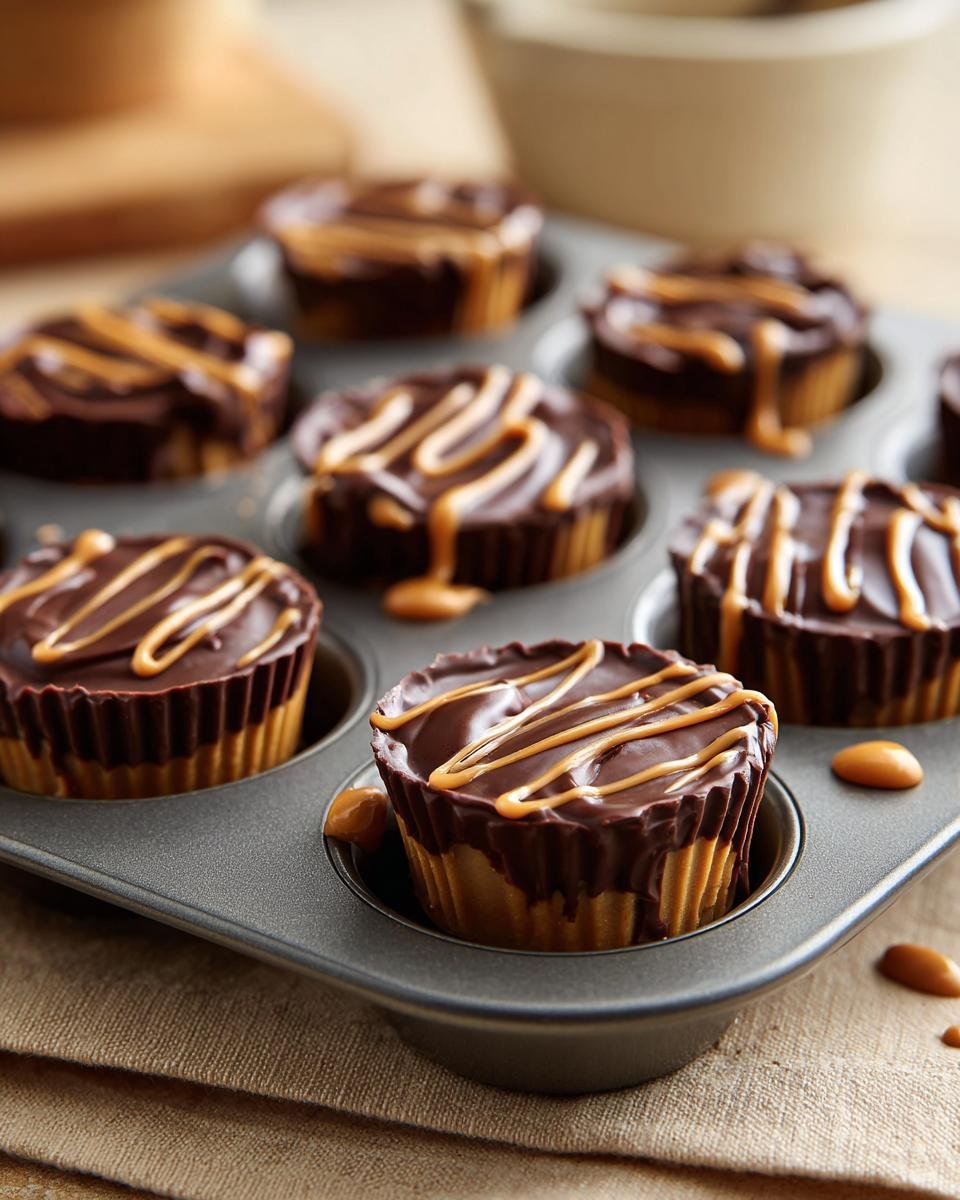
Oh my goodness, let me tell you about these Peanut Butter Fudge Cups! They’re absolutely irresistible, with a creamy fudge filling that just melts in your mouth. Seriously, every bite is like a little hug of happiness! I remember the first time I made these for a family gathering; everyone went wild over them! My Aunt Karen couldn’t stop raving about how they perfectly balance rich peanut butter and sweet chocolate. You’ll want to whip up a batch for your next get-together, trust me! They’re not just cookies; they’re a delightful experience that everyone will love!

Ingredients List
Before diving into the magic of making these Peanut Butter Fudge Cups, let’s gather all the ingredients! Here’s what you’ll need:
- ½ cup butter, softened (or coconut oil)
- ½ cup creamy peanut butter
- ½ cup white sugar
- ½ cup brown sugar, packed
- 1 egg
- ½ tsp vanilla extract
- 1 ¼ cups all-purpose flour
- ¾ tsp baking soda
- ½ tsp salt
- 1 cup milk chocolate chips
- 1 cup semi-sweet chocolate chips
- 14 oz can sweetened condensed milk
- 1 tsp vanilla extract
Make sure you have everything on hand before you start, so you can enjoy the process without any interruptions. Trust me, you don’t want to be halfway through and realize you’re missing the peanut butter! Happy baking!
How to Prepare the Peanut Butter Fudge Cups Recipe
Preheat and Prepare
Let’s get started on these delightful Peanut Butter Fudge Cups! First, preheat your oven to 325 degrees F (165 degrees C). This step is super important because a properly preheated oven ensures your cookie cups bake evenly and come out perfectly fluffy. While that’s heating up, grab your mini muffin pan and spray it liberally with cooking spray. You want to make sure those little treats pop out easily once they’re baked. No one likes a stuck cookie cup, right?
Make the Cookie Dough
Now, onto the fun part—making the cookie dough! In a mixing bowl, use a hand mixer to cream together the softened butter, creamy peanut butter, white sugar, and brown sugar. You’re looking for a nice, fluffy consistency that’s light in color—this should take about 2-3 minutes. Once that’s achieved, add the egg and vanilla extract, mixing until everything is combined. Now, it’s time to incorporate your dry ingredients! Gently add the flour, baking soda, and salt. Mix just until combined, avoiding overmixing to keep those cookie cups tender. The dough should be thick but pliable, perfect for scooping!
Bake the Cookie Cups
Grab your trusty 1 tablespoon scoop and measure out the dough into each compartment of your prepared mini muffin tin. Try to be as even as possible, as this helps them bake uniformly. Pop the tin into the preheated oven and bake for 14 to 16 minutes, or until the tops are lightly browned. You’ll know they’re ready when they look puffy and just set, but don’t forget this crucial step: as soon as they come out of the oven, use a melon baller or a 1 teaspoon measuring spoon to make a well in the center of each cookie cup. This creates the perfect little pocket for our delicious fudge filling!
Prepare the Fudge Filling
While those cookie cups are cooling (give them about 8-10 minutes in the tin), let’s make the fudge filling! In a microwave-safe bowl, combine the milk chocolate chips, semi-sweet chocolate chips, and the sweetened condensed milk. Microwave them on high for 1-2 minutes, stirring every 30 seconds until the mixture is smooth and creamy. If you find it’s too thick after melting, don’t hesitate to add a splash more condensed milk to reach that luscious fudge consistency!
Assemble the Peanut Butter Fudge Cups
Now comes the best part—assembling your Peanut Butter Fudge Cups! Carefully transfer about half of the melted fudge mixture into a quart-sized ziplocked bag. Squeeze all the fudge into one corner and then snip a tiny piece off the corner. This makes piping it into the cookie cups a breeze! Just pipe the fudge into each well until it’s filled to the top. If your fudge starts to harden a bit, no worries—just pop it back in the microwave for 10-15 seconds to soften it up again.
Final Touches
To finish these beauties, heat about 1 tablespoon of peanut butter in a small baggie and drizzle it over the tops of each fudge-filled cookie cup. It adds a lovely finishing touch and a bit more peanut butter goodness! For serving, I like to place them on a pretty platter; they look so inviting! You can also sprinkle a few sea salt flakes on top for that sweet-salty contrast. Trust me, everyone will be diving in for seconds!
Nutritional Information
Now, let’s talk numbers! Here’s the estimated nutritional data for each Peanut Butter Fudge Cup, which is about one cookie cup:
- Calories: 209
- Fat: 10g
- Protein: 3g
- Carbohydrates: 26g
- Sugar: 21g
- Sodium: 134mg
- Fiber: 1g
- Cholesterol: 19mg
Keep in mind that these figures are estimates and can vary based on the specific brands and types of ingredients you use. It’s always a good idea to double-check if you’re tracking your macros or just curious about your treats! Happy indulging!
Tips for Success
Alright, let’s make sure your Peanut Butter Fudge Cups turn out absolutely perfect! Here are some pro tips that I’ve learned over the years, so you can tackle this recipe like a champ!
Ingredient Substitutions
If you’re looking to switch things up a bit, there are some easy substitutions you can make! For the butter, you can totally use coconut oil if you want a dairy-free option. Just remember, it might give a slight coconut flavor, which can be delightful! If you’re out of brown sugar, you can substitute it with an equal amount of white sugar mixed with a teaspoon of molasses for that same rich flavor. And if you’re not a fan of chocolate chips, feel free to swap them for butterscotch or even white chocolate chips—yum!
Troubleshooting Common Issues
Now, let’s talk about a few hiccups you might encounter. If your cookie cups aren’t rising as much as you’d like, it might be due to old baking soda. Always check the expiration date to ensure it’s fresh! If the fudge filling is too thick, don’t hesitate to add a tiny splash of milk or condensed milk while melting it to reach that perfect creamy consistency. And if your cookie cups are sticking to the pan, it’s probably time to be a bit more generous with that cooking spray! A well-greased pan is key to effortless removal.
Enhancing Flavor
Want to take your Peanut Butter Fudge Cups to the next level? Consider adding a pinch of sea salt to the fudge mixture right before you pipe it into the cups. It brings out the sweetness beautifully! You could also mix in some chopped nuts for a delightful crunch or a sprinkle of cinnamon for a warm, cozy flavor. And if you’re feeling adventurous, try swirling in some raspberry or strawberry preserves into the fudge for a fruity twist—trust me, it’s a game changer!
With these tips in your back pocket, you’re all set to create some truly amazing Peanut Butter Fudge Cups. Enjoy the process, and don’t forget to share with your friends and family (or not!). Happy baking!
Variations
Now, let’s get a little creative with these Peanut Butter Fudge Cups! The beauty of this recipe is its flexibility, and I just love experimenting with different flavors and textures. Here are some fun variations that you can try to mix things up!
Chocolate Choices
First off, let’s talk chocolate! While I adore the classic combo of milk and semi-sweet chocolate chips, you can switch things up based on your taste preferences. Dark chocolate chips can add a rich, slightly bitter contrast to the sweet fudge filling. Or, if you’re a white chocolate lover, go ahead and use white chocolate chips for a creamy, dreamy filling! You could even layer different chocolates for a stunning visual effect—like a dark chocolate bottom and white chocolate top!
Nutty Add-Ins
For those who enjoy a little crunch, adding nuts can make a delightful difference. Chopped peanuts mixed into the fudge filling or sprinkled on top will give your treats a lovely texture. If you’re feeling adventurous, try using pecans or walnuts for a different flavor profile. Just be sure to chop them finely so they fit perfectly in each cookie cup!
Dried Fruits and Flavor Twists
If you want to add a fruity twist, consider mixing in some dried fruits like cranberries, cherries, or even raisins into the fudge filling. They’ll add a pop of sweetness and a chewy texture that pairs beautifully with the creamy fudge. You could also fold in some coconut flakes for a tropical touch—just imagine the flavor explosion!
Modified Filling Ideas
Feeling a little adventurous? You could change the fudge filling itself! Instead of the classic fudge, try making a peanut butter cream filling by whipping together some cream cheese and peanut butter, then sweetening it with powdered sugar. It’s so light and fluffy! Another fun idea is to infuse your fudge with flavors like espresso or mint extract for an unexpected kick. Just a drop or two can elevate the taste to something extraordinary!
These variations make it easy to personalize your Peanut Butter Fudge Cups to suit any occasion or taste preference. So, don’t hesitate to get creative and make these treats your own! Happy experimenting, and I can’t wait to hear about your delicious creations!
Storage & Reheating Instructions
Let’s make sure those delicious Peanut Butter Fudge Cups stay fresh and tasty! Proper storage is key to keeping them at their best. Once they’ve cooled completely, store your cookie cups in an airtight container at room temperature. They’ll stay fresh for about 5 days, but I doubt they’ll last that long—trust me, they’re too good to resist!
If you want to keep them for a longer time, you can freeze these little delights! Just place them in a single layer in a freezer-safe container or a ziplock bag, separating layers with parchment paper to prevent sticking. They’ll stay good in the freezer for up to 3 months. When you’re ready to indulge, simply take them out and let them thaw at room temperature for a bit before enjoying. No need to rush; those flavors will be even more delightful once they’re perfectly defrosted!
Now, if you prefer them warm and gooey, you can easily reheat them. Pop them in the microwave for about 10-15 seconds—just enough to get that fudge filling nice and melty again. Keep an eye on them, though; you don’t want them to get too hot and lose that creamy texture. Warmed up, they’re just like fresh out of the oven, and that’s a treat you don’t want to miss!
FAQ Section
Q1. Can I make these Peanut Butter Fudge Cups ahead of time?
Absolutely! You can prepare the cookie cups ahead of time and store them in an airtight container for up to 5 days. Just wait to fill them with the fudge until you’re ready to serve for the best texture.
Q2. What’s the best way to store leftovers?
To keep your Peanut Butter Fudge Cups fresh, store them in an airtight container at room temperature. If you want to save them for later, freeze them for up to 3 months and let them thaw before enjoying!
Q3. Can I use natural peanut butter for this recipe?
You can use natural peanut butter, but keep in mind that it tends to be a bit runnier and may change the texture of the cookie dough slightly. If you go this route, make sure to mix it well to incorporate any oil that may separate.
Q4. How can I make these cookie cups gluten-free?
To make your Peanut Butter Fudge Cups gluten-free, simply substitute the all-purpose flour with a gluten-free flour blend. Just ensure that your other ingredients, like chocolate chips, are also gluten-free.
Q5. What can I substitute for the sweetened condensed milk?
If you don’t have sweetened condensed milk on hand, you can make a homemade version by simmering regular milk with sugar until it thickens. Alternatively, you can use evaporated milk and add sugar to taste, but the texture may differ slightly.
For more recipes follow me in page Facebook and Pinterest.
Print
Peanut Butter Fudge Cups Recipe: 5 Irresistible Delights
- Total Time: 36 minutes
- Yield: 24 cookie cups 1x
- Diet: Vegetarian
Description
Delicious peanut butter fudge cups with a creamy fudge filling.
Ingredients
- ½ cup butter softened (or coconut oil)
- ½ cup creamy peanut butter
- ½ cup white sugar
- ½ cup brown sugar packed
- 1 egg
- ½ tsp vanilla extract
- 1 ¼ cups all-purpose flour
- ¾ tsp baking soda
- ½ tsp salt
- 1 cup milk chocolate chips
- 1 cup semi-sweet chocolate chips
- 14 oz can sweetened condensed milk
- 1 tsp vanilla extract
Instructions
- Preheat oven to 325 degrees F (165 degrees C). Spray a mini muffin pan liberally with cooking spray.
- Using a hand mixer, cream the butter, peanut butter, and white and brown sugars. Mix in egg and vanilla extract. Add in flour, baking soda, and salt, stir until combined.
- Measure out the dough into 1 TBSP scoops and place each scoop in one compartment of a mini muffin tin.
- Bake for 14 to 16 minutes, or until lightly browned.
- Remove the cookies from the oven and immediately make wells in the center of each using a melon baller or a 1 tsp measuring spoon. Let them cool in the pan for 8-10 minutes, then carefully remove to wire racks to cool completely.
- Combine the chocolate chips and sweetened condensed milk in a microwave-safe bowl. Mix lightly and microwave on high for 1-2 minutes, stirring until smooth. Add the vanilla extract and stir again.
- Transfer about half the fudge mixture into a quart-sized ziplocked bag. Squeeze the fudge into a corner of the bag, then snip the corner off and pipe the fudge into the cookies.
- If the remaining fudge gets too solid, microwave for 10-15 seconds to soften. Refill the bag and continue to pipe until all cups are full.
- Heat up about 1 TBSP of peanut butter in a small baggie and drizzle it over the tops of the fudge cups. Serve and enjoy!
Notes
- These cookie cups will stay fresh for up to 5 days if stored in an airtight container at room temperature.
- They can be frozen for up to 3 months. Thaw at room temperature before serving.
- Prep Time: 20 minutes
- Cook Time: 16 minutes
- Category: Dessert
- Method: Baking
- Cuisine: American
Nutrition
- Serving Size: 1 cookie cup
- Calories: 209
- Sugar: 21g
- Sodium: 134mg
- Fat: 10g
- Saturated Fat: 5g
- Unsaturated Fat: 4g
- Trans Fat: 0.1g
- Carbohydrates: 26g
- Fiber: 1g
- Protein: 3g
- Cholesterol: 19mg
Keywords: Peanut Butter Fudge Cups Recipe