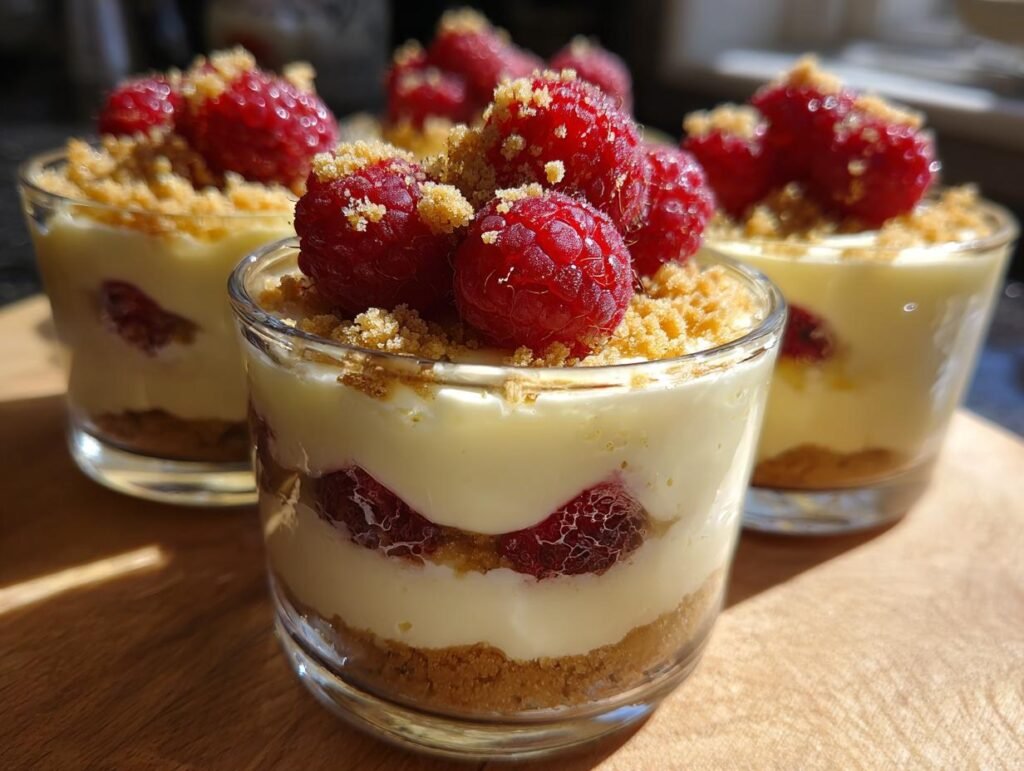
Let me tell you, there’s something truly magical about No-Bake Cheesecake Cups! They’re like little clouds of creamy goodness that you can whip up in no time, making them the perfect treat for any occasion. I remember the first time I made these for a family gathering – everyone was raving about them, and I couldn’t believe how easy they were to put together! Seriously, no oven required! Just a few simple ingredients and a little chilling time, and you’ve got a dessert that feels fancy but is totally stress-free.
What I love most about these cups is how versatile they are. You can jazz them up with your favorite toppings – think fresh berries, whipped cream, or even a sprinkle of crushed cookies for that extra crunch. And trust me, the satisfaction of digging into a beautifully layered cheesecake cup is simply unbeatable. So, whether you’re hosting a party, celebrating a birthday, or just treating yourself on a Wednesday, these No-Bake Cheesecake Cups are bound to impress. Ready to dive in with me? Let’s get started!
Ingredients List
Here’s what you’ll need to create these dreamy No-Bake Cheesecake Cups. I promise, it’s a simple list that won’t overwhelm you!
- 3/4 cup graham cracker crumbs – This will form the crunchy base that contrasts beautifully with the creamy filling.
- 2 tbsp salted butter, melted – This brings everything together and adds a rich flavor to the crust.
- 8 oz cream cheese, softened – Make sure it’s softened for easy mixing. This is the star of the show!
- 1/2 cup granulated sugar – To sweeten the filling just right. You can adjust this if you like it less sweet!
- 1 teaspoon pure vanilla extract – A splash of vanilla elevates the flavor to a whole new level.
- 1 cup heavy whipping cream – This is what gives your cheesecake its light and fluffy texture. Don’t skimp on this!
- Optional toppings: raspberries, strawberries, whipped cream, broken cookies, graham cracker crumbs – Feel free to get creative here! These toppings add a pop of color and flavor.
Gather these ingredients, and you’ll be all set to make a dessert that’s sure to impress!
How to Prepare No-Bake Cheesecake Cups Recipe
Ready to make your very own No-Bake Cheesecake Cups? Let’s dive into the fun part! I’ll walk you through each step, so you can create these delightful treats with confidence. Just follow along, and you’ll have a stunning dessert in no time!
Step 1: Prepare the Crust
First things first, let’s whip up that delicious crust! In a small bowl, combine the 3/4 cup of graham cracker crumbs with the 2 tablespoons of melted salted butter. I like to use a fork to mix it well until all the crumbs are evenly coated and resemble wet sand. Now, here’s the fun part: take about 2-3 tablespoons of this mixture and press it firmly into the bottom of each glass or serving dish. You want a nice, compact layer to hold everything together. Don’t be shy – use the back of a spoon or your fingers to really pack it down!
Step 2: Make the Cheesecake Filling
Now onto the creamy goodness! In a large mixing bowl, pour in that luscious 1 cup of heavy whipping cream. Grab your mixer and whip it on high speed until you see those stiff peaks form – this usually takes about one minute. Once that’s done, gently transfer the whipped cream to another bowl. In the same mixing bowl, combine 8 oz of softened cream cheese, 1/2 cup of granulated sugar, and 1 teaspoon of pure vanilla extract. Mix this until it’s super smooth and creamy. Now, the key here is to fold the whipped cream into the cream cheese mixture. Take your time and use a spatula to gently fold it together until it’s just combined. You want to keep that light and airy texture, so be gentle!
Step 3: Assemble the Cheesecake Cups
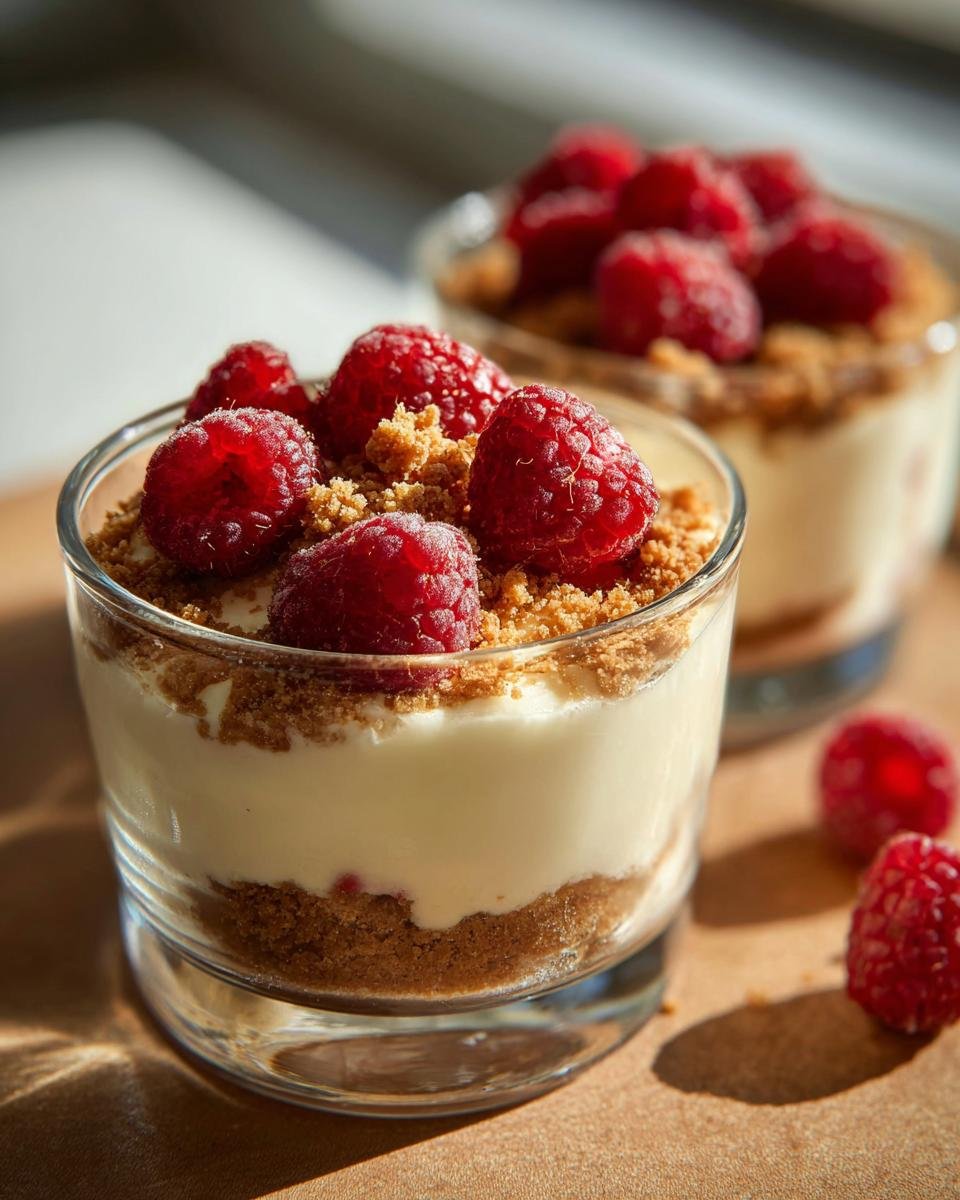
Alright, now we get to the fun part – assembling those cheesecake cups! You can either scoop the filling into a piping bag or just grab a spoon and divide it evenly among your cups. Fill each cup until it’s just about full, leaving a little room for any toppings you want to add later. Speaking of toppings, this is where you can really get creative! I love adding fresh raspberries or strawberries on top for a burst of color and flavor. You can even sprinkle some crushed cookies or graham cracker crumbs to add that extra crunch. Trust me; it looks gorgeous!
Step 4: Chill Before Serving
Now, the hardest part – waiting! Cover your assembled cheesecake cups with plastic wrap and pop them in the fridge for at least an hour. This chilling time is super important because it enhances the flavor and helps the cheesecake set perfectly. If you can hold off for longer, even better! Just be sure to keep an eye on the clock because you won’t want to miss out on this deliciousness. Once they’re chilled and ready to go, they’ll be the star of any gathering!
Nutritional Information
Alright, let’s chat about the nutritional side of these delightful No-Bake Cheesecake Cups. I always think it’s good to know what you’re indulging in, right? Here’s a rough breakdown of what you can expect per serving (about one cup):
- Calories: 400
- Fat: 30g
- Saturated Fat: 18g
- Unsaturated Fat: 8g
- Trans Fat: 0g
- Cholesterol: 80mg
- Sodium: 200mg
- Carbohydrates: 30g
- Fiber: 1g
- Sugar: 25g
- Protein: 5g
Keep in mind, these values are estimates and can vary based on the brands of ingredients you use or any tweaks you make to the recipe. But knowing these numbers gives you a little insight into the deliciousness you’re about to enjoy. So, dive in and savor every bite of your No-Bake Cheesecake Cups!
Why You’ll Love This Recipe
Let me share with you why these No-Bake Cheesecake Cups are a total game changer! You’ll be reaching for this recipe again and again, and here’s why:
- Quick Preparation: You can whip these up in just about 20 minutes! No long baking times or complicated steps – just mix and chill.
- No Baking Required: Seriously, no oven needed! This makes it perfect for those hot summer days when you don’t want to heat up the kitchen.
- Customizable Toppings: The sky’s the limit! Add your favorite fruits, drizzle chocolate sauce, or sprinkle crushed cookies – make it your own!
- Delicious Flavor: The creamy filling paired with that crunchy graham cracker crust is pure bliss. Each bite is a delightful balance of flavors and textures.
- Impressive Presentation: Serve these in pretty cups, and they look like you spent hours in the kitchen. Your guests will be so impressed!
- Perfect for Any Occasion: Whether it’s a birthday party, holiday gathering, or just a cozy night in, these cups fit right in!
Trust me, once you try these No-Bake Cheesecake Cups, you’ll understand why they’re a favorite in my kitchen!
Tips for Success
To help you nail these No-Bake Cheesecake Cups every single time, I’ve got some handy tips that’ll make the process even smoother and the results even tastier. Trust me, these little nuggets of wisdom will be your secret weapons in the kitchen!
Start with Room Temperature Ingredients
First things first, make sure your cream cheese is softened to room temperature before you start mixing. This really helps to create that smooth and creamy filling without any lumps. If you forget to take it out ahead of time, you can cut it into smaller cubes and microwave it for about 10-15 seconds. Just be careful not to overheat it!
Whip the Cream to Stiff Peaks
When you whip the cream, aim for those stiff peaks! This is what gives your cheesecake cups that light and airy texture. It’s okay if you take a minute longer than expected – just keep an eye on it. If you over-whip, it can turn grainy, so stop as soon as those peaks hold their shape!
Chill for Optimal Flavor
Don’t rush the chilling process! While one hour is the minimum, I highly recommend letting your cheesecake cups chill for at least two hours, or even overnight if you can wait. This resting time lets the flavors meld beautifully and helps the filling set just right. You’ll thank yourself when you taste that perfect blend of creaminess!
Mind the Toppings
If you’re adding fresh fruit as a topping, do it right before serving. This keeps the fruit looking vibrant and fresh. If you add it too early, it might release moisture and make the cups soggy. Also, if you’re using any crunchy toppings like cookies or nuts, consider adding those right before serving as well to maintain that delightful crunch!
Don’t Be Afraid to Get Creative
Feel free to experiment with flavors! If you want to get adventurous, try mixing in some lemon zest or a splash of almond extract into the filling for a unique twist. You can also switch up the toppings based on the season or occasion. The more creative you get, the more fun these cups become!
With these pro tips in your back pocket, you’ll be well on your way to impressing your family and friends with these delicious No-Bake Cheesecake Cups. Happy baking (or should I say, mixing)! Enjoy every creamy bite!
Variations
One of the best things about these No-Bake Cheesecake Cups is how easily you can put your own spin on them! Let your creativity run wild and try out some of these delightful variations that will keep things fresh and exciting.
Chocolate Delight
If you’re a chocolate lover, this one’s for you! Simply melt about 4 ounces of semi-sweet chocolate and let it cool slightly before folding it into your cream cheese mixture. You can also sprinkle some mini chocolate chips on top for an extra chocolaty crunch. Each bite will be a dreamy chocolate experience!
Fruit-Infused Bliss
For a fruity twist, consider blending in some pureed fruit into the filling. Strawberries, raspberries, or even mango puree work beautifully! Just substitute about 1/4 cup of the cream cheese for the fruit puree, and watch the flavor transform. Top with fresh fruit pieces to really showcase that fruity goodness.
Lemon Zest Surprise
Craving something zesty? Add the zest of one lemon and a tablespoon of lemon juice to the cream cheese mixture. This will give your cheesecake cups a refreshing citrus kick. Pair it with a light blueberry topping for a lovely contrast of flavors!
Peanut Butter Lover’s Treat
If you love peanut butter, try swirling in about 1/2 cup of creamy peanut butter into the filling. The nutty flavor pairs beautifully with the creaminess of the cheesecake. You can even top it off with crushed peanuts or a drizzle of chocolate for an indulgent treat!
Coconut Cream Dream
For a tropical vibe, mix in some shredded coconut into the filling. You can also substitute half of the heavy cream with coconut cream for that rich coconut flavor. Top with toasted coconut flakes for an extra crunch and a beautiful presentation!
Spiced Pumpkin Cups
Seasonal flavors can also be a hit! During fall, add 1/2 cup of pumpkin puree along with a teaspoon of pumpkin pie spice to the cream cheese filling. These spiced pumpkin cheesecake cups are perfect for holiday gatherings and absolutely delicious!
These variations are just the start – feel free to mix and match flavors, toppings, and even crusts! The sky’s the limit, so have fun experimenting with these No-Bake Cheesecake Cups to make them uniquely yours. Trust me, each new version will be just as delightful as the last! Enjoy!
Serving Suggestions
When it comes to serving your No-Bake Cheesecake Cups, you’ll want to think about what complements that creamy goodness perfectly. Here are some delightful ideas to elevate your dessert experience:
- Freshly Brewed Coffee or Tea: A warm cup of coffee or a soothing herbal tea pairs beautifully with the cheesecake’s creamy texture. The rich flavors of coffee or the gentle notes of tea create a comforting combination that’s hard to beat.
- Fruit Salads: A light fruit salad with seasonal fruits adds a refreshing contrast to the richness of the cheesecake. Think bright berries, citrus segments, or even a mix of tropical fruits to bring a burst of color and flavor to your plate!
- Chocolate Drizzle: If you’re feeling a little indulgent, a drizzle of chocolate sauce not only looks stunning but also adds a delightful sweetness that pairs perfectly with the creamy filling. You can even serve it on the side for guests to add their preferred amount!
- Whipped Cream: While the cheesecake cups are already creamy, a dollop of freshly whipped cream on top adds an extra layer of fluffiness. You can even flavor it with a dash of vanilla or a sprinkle of cocoa powder for a twist!
- Ice Cream: For an over-the-top dessert treat, serve a scoop of vanilla or berry ice cream alongside the cheesecake cups. The cold creaminess of the ice cream complements the cheesecake wonderfully and makes for a decadent dessert experience!
- Cookies or Biscotti: A crunchy cookie or biscotti on the side provides a delightful texture contrast. They’re perfect for dipping into the cheesecake cups or enjoying as a light snack alongside them.
With these serving suggestions, you’ll create a delightful dessert spread that’ll impress your guests and make your No-Bake Cheesecake Cups shine even brighter. Enjoy every moment of this delicious experience!
Storage & Reheating Instructions
So, you’ve made these delightful No-Bake Cheesecake Cups, and now you find yourself with some leftovers (if that ever happens!). Don’t worry, I’ve got you covered on how to store them properly so you can enjoy that creamy goodness later!
First things first, if you have any cheesecake cups left after your gathering, make sure to cover them tightly with plastic wrap or transfer them to an airtight container. This helps keep them fresh and prevents any fridge odors from sneaking in. They’ll stay delicious in the refrigerator for about 3-4 days. Just a little tip: if you’ve added fresh fruit on top, it’s best to store the fruit separately and add it just before serving to keep everything looking fresh and vibrant!
Now, if you want to enjoy your No-Bake Cheesecake Cups later, but you’re worried about texture, here’s a little secret: they actually don’t freeze very well due to the cream cheese and whipped cream. But, if you find yourself in a pinch, you can freeze them without toppings for up to a month. Just make sure to wrap them well in plastic wrap and then place them in a freezer-safe container. When you’re ready to enjoy them, let them thaw in the fridge overnight, and then add your favorite toppings before serving.
Trust me, with these storage tips, you’ll be savoring those creamy cheesecake cups for days to come! Enjoy every luscious bite, whether it’s fresh out of the fridge or after a little thawing magic!
For more recipes follow me in page Pinterest.
Print
No-Bake Cheesecake Cups Recipe: 7 Steps to Blissful Indulgence
- Total Time: 1 hour 20 minutes
- Yield: 4 servings 1x
- Diet: Vegetarian
Description
No-Bake Cheesecake Cups are a simple and delicious dessert that requires no baking. Perfect for any occasion.
Ingredients
- 3/4 cup graham cracker crumbs
- 2 tbsp salted butter, melted
- 8 oz cream cheese, softened
- 1/2 cup granulated sugar
- 1 teaspoon pure vanilla extract
- 1 cup heavy whipping cream
- Optional toppings: raspberries, strawberries, whipped cream, broken cookies, graham cracker crumbs
Instructions
- In a small bowl, stir together the melted butter and graham cracker crumbs until evenly distributed. Put 2-3 tablespoons of the mixture into the bottom of each glass or serving dish.
- In a large bowl, pour the whipped cream in and beat on high until stiff peaks form (around one minute).
- Scrape the whipped cream into a second bowl. Combine the cream cheese, sugar, and vanilla and mix until smooth and creamy.
- Gently fold the whipped cream into the cream cheese mixture until completely combined.
- Spoon the mixture into a piping bag or divide it evenly among your cups and spoon it in.
- Top with fresh fruit if desired, cover, and chill for at least an hour before serving.
Notes
- Chill for optimal flavor and texture.
- Feel free to customize toppings based on your preference.
- Prep Time: 20 minutes
- Cook Time: 0 minutes
- Category: Dessert
- Method: No-Bake
- Cuisine: American
Nutrition
- Serving Size: 1 cup
- Calories: 400
- Sugar: 25g
- Sodium: 200mg
- Fat: 30g
- Saturated Fat: 18g
- Unsaturated Fat: 8g
- Trans Fat: 0g
- Carbohydrates: 30g
- Fiber: 1g
- Protein: 5g
- Cholesterol: 80mg
Keywords: No-Bake Cheesecake Cups, dessert, easy recipe, cheesecake