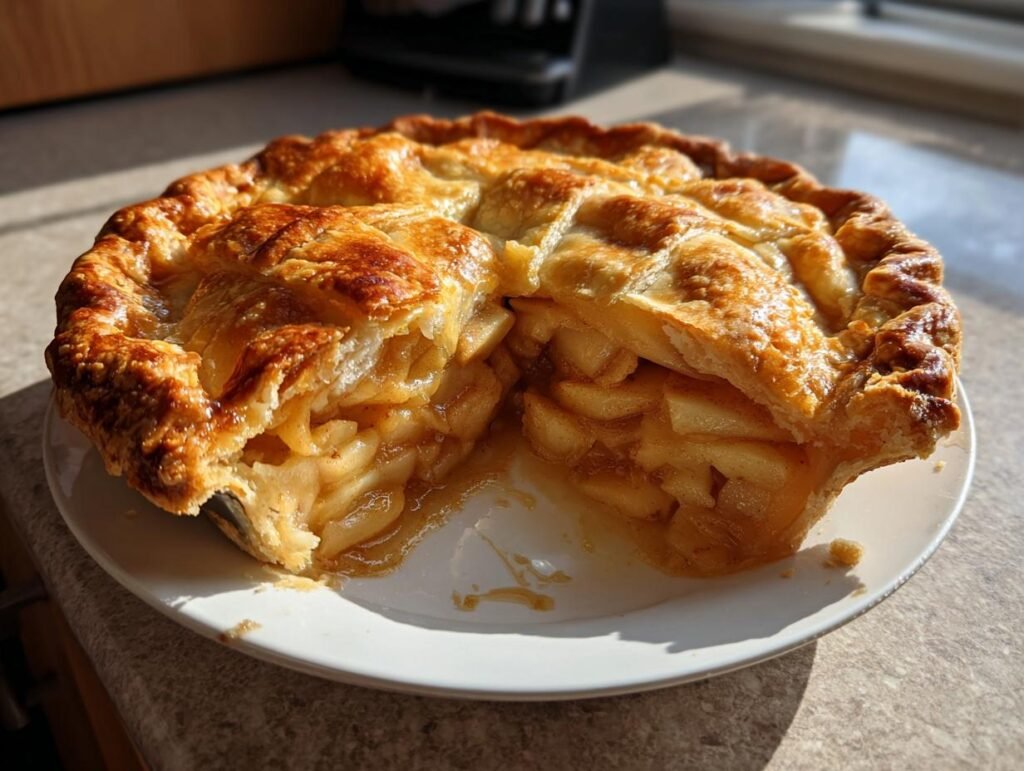
There’s something magical about the smell of apple pie wafting through the house, isn’t there? I can still remember those cozy autumn afternoons at my grandmother’s kitchen, where she’d roll out dough and slice apples with such care. The way she combined sweet and tart Granny Smith apples with just the right amount of sugar and spices was pure artistry. I loved sneaking tastes of the filling when I thought she wasn’t looking! That warm, comforting apple pie became a staple for family gatherings and holiday celebrations. Now, I want to share that joy with you through my easy apple pie recipe.
This recipe captures all the deliciousness of that beloved dessert without any fuss. You don’t need to be a pastry chef to whip this up! With just a few simple ingredients and straightforward steps, you’ll have a flaky crust and a sweet apple filling baked to perfection. So, preheat that oven and let’s dive into making your own easy apple pie that’s sure to wow your family and friends. Trust me, once you try this, you’ll be making it for every occasion!
Ingredients for Easy Apple Pie
Gathering the right ingredients is key for a perfect easy apple pie, and I’ve got you covered with everything you’ll need:
- 2 (9-inch) pie crusts: You can use store-bought or homemade, just make sure they’re nice and flaky!
- 7 large Granny Smith apples: Peel, core, and slice them into ½ inch slices. These tart apples bring the perfect balance of flavor.
- ½ cup granulated sugar: This will sweeten the filling just right.
- ½ cup light brown sugar: Loosely packed, it adds a deeper flavor that complements the apples beautifully.
- 2 tablespoons all-purpose flour: This helps thicken the filling, keeping it from being too runny.
- 1 teaspoon ground cinnamon: The warm spice that everyone loves in apple pie!
- ⅛ teaspoon ground nutmeg: Just a pinch adds a lovely depth to the flavor.
- 1 tablespoon lemon juice: Plus, the zest of half a lemon! This brightens up the apples and enhances their flavor.
- 1 large egg: Lightly beaten, this will be brushed on top for a beautiful golden finish.
- 2 tablespoons sanding sugar (optional): For a little extra sparkle and sweetness on top!
With these ingredients, you’re all set to create a delightful apple pie that will fill your kitchen with the best aromas. Let’s get cooking!
How to Prepare Easy Apple Pie
Now that you’ve got all your ingredients ready, let’s dive into the fun part – preparing your easy apple pie! This process is straightforward and totally satisfying. I promise, you’ll be amazed at how simple it is to create a pie that tastes like it came straight from Grandma’s kitchen.
Preparing the Pie Crust
First off, if you’re making your own pie crust, start by mixing the ingredients – flour, salt, and butter – until you get a crumbly texture. If you’re using store-bought crusts, just take them out of the fridge and let them sit for about 15 minutes to soften slightly. This makes them easier to work with!
Next, roll out your dough on a lightly floured surface. Aim for about a 12-inch circle for the bottom crust, and don’t worry if it’s not perfect! Gently transfer the rolled-out dough into your pie plate, making sure it fits snugly. Trim any excess dough hanging over the edges, and remember to save some for the top crust!
Making the Apple Filling
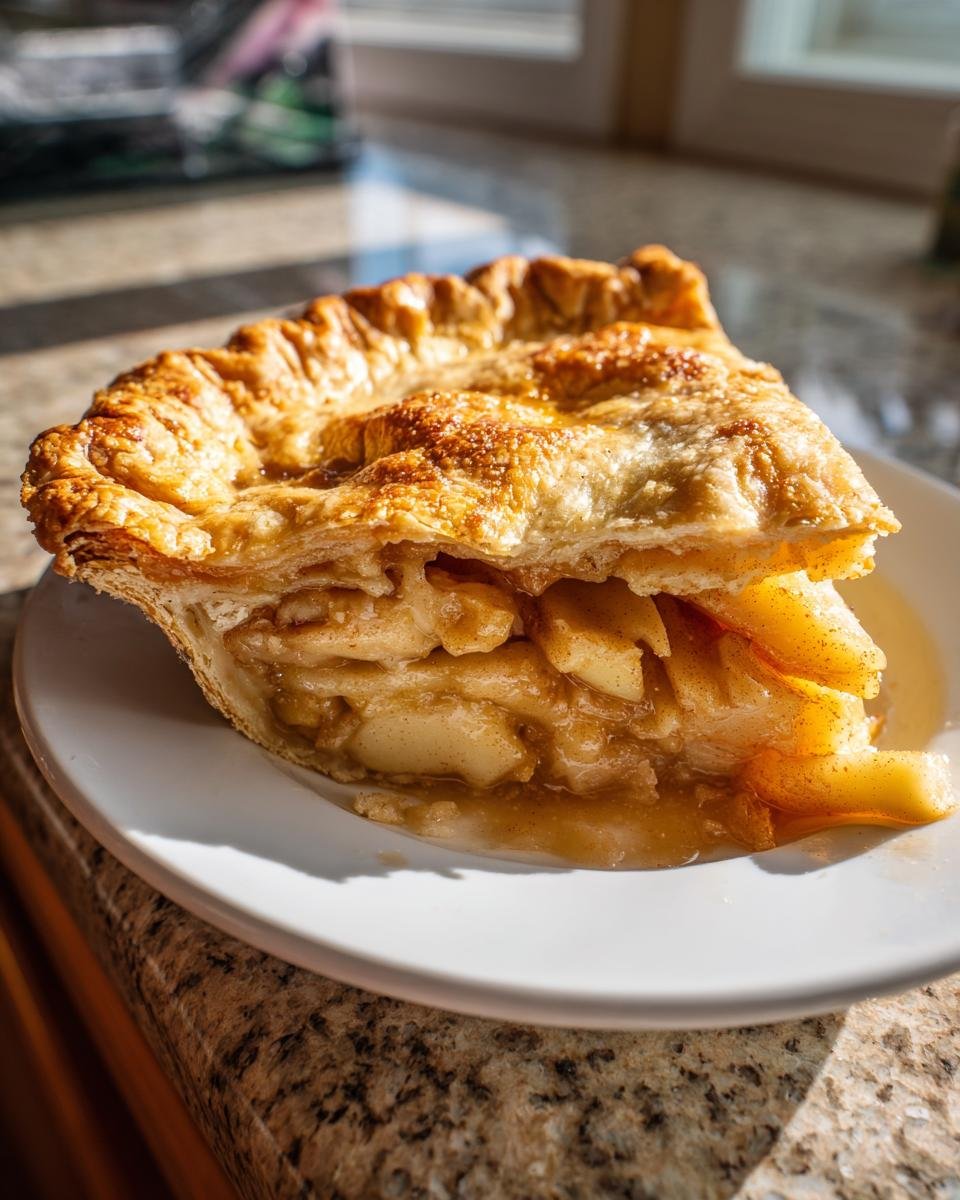
Now, let’s work on that apple filling! In a large bowl, toss your sliced Granny Smith apples with the granulated sugar, light brown sugar, flour, cinnamon, nutmeg, lemon juice, and zest. This step is crucial – you want to coat those apple slices evenly so every bite is bursting with flavor. Take a moment to mix it well; your future pie will thank you!
Assembling the Pie
Once your filling is ready, it’s time to assemble the pie! Spoon the apple mixture into the prepared bottom crust, making sure to leave behind any juices in the bowl (we don’t want a soggy bottom!). Roll out your second disc of dough to about ⅛ inch thick, and gently lay it over the apples.
Next, trim any excess dough and crimp the edges to seal the pie. This creates that beautiful, rustic look while keeping the filling snug inside. Don’t forget to cut 4 slits in the top crust to allow steam to escape – this is key to avoid any bubbling over!
Baking Instructions
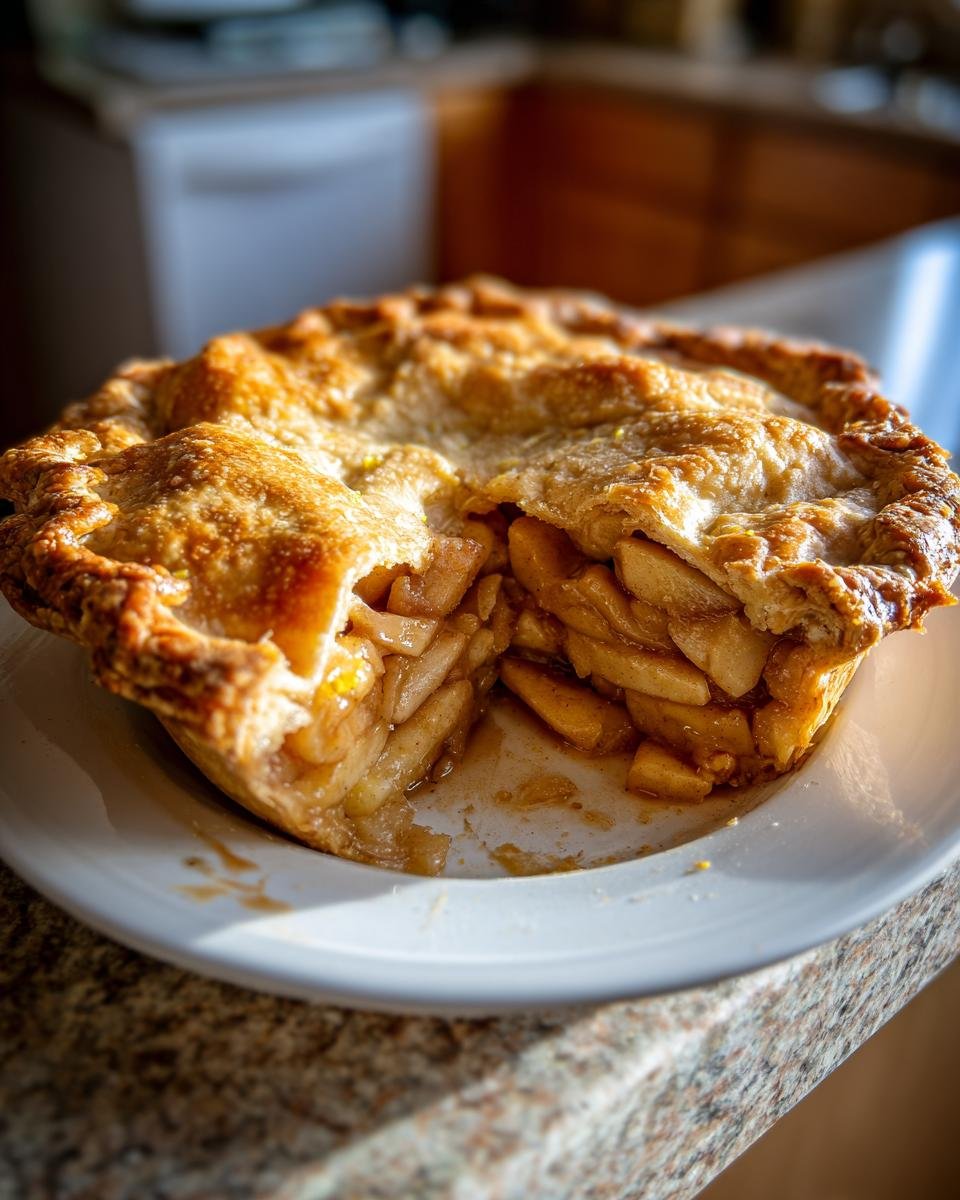
Now for the baking magic! Preheat your oven to 400°F (204°C) and place your pie on the center rack. Brush the top crust with the beaten egg for that gorgeous golden finish, and if you’re feeling fancy, sprinkle some sanding sugar on top. Cover the edges with a pie shield or some foil for the first 25 minutes to prevent burning.
Bake for 25 minutes at 400°F, then remove the shield, lower the temperature to 375°F, and let it bake for an additional 30-35 minutes until the crust is golden brown and the filling is bubbling. Oh, the smell will be irresistible! Once it’s done, let it cool at room temperature for at least 3 hours before slicing into it. This helps all those delicious flavors meld together perfectly!
Why You’ll Love This Easy Apple Pie
Let me tell you why this easy apple pie is bound to become your new favorite dessert! Here are just a few reasons to love it:
- Quick Preparation: With just a handful of simple ingredients and straightforward steps, you can whip up this pie in no time. It’s perfect for those last-minute gatherings or cozy family dinners!
- Delicious Flavor: The combination of tart Granny Smith apples, warm spices, and a touch of sweetness creates a flavor explosion that’s simply irresistible. Each bite brings back that nostalgic feeling of home!
- Versatile for Any Occasion: Whether it’s a holiday feast, a picnic in the park, or just a cozy night in, this pie fits right in. Serve it warm with a scoop of vanilla ice cream for an extra special treat!
- Impressive Presentation: Your friends and family will be in awe when they see you pull this beautiful pie out of the oven. The golden crust and bubbling apple filling are a sight to behold!
- Perfect for Sharing: This recipe yields 8 generous slices, making it ideal for sharing with loved ones. Nothing brings people together quite like a homemade pie!
Trust me, once you make this easy apple pie, you’ll understand why it’s a cherished recipe in my family. Get ready to spread the joy!
Tips for Success
Let’s ensure your easy apple pie turns out absolutely perfect! Here are some of my favorite tips that I’ve gathered over the years, and trust me, they make all the difference:
Preventing a Soggy Bottom Crust
There’s nothing worse than biting into a beautiful pie only to find a soggy bottom! To avoid this, I recommend pre-baking your bottom crust for about 10 minutes before adding the apple filling. This gives it a head start and helps it stay crispy. You can also sprinkle a thin layer of flour or breadcrumbs on the crust before adding the apples; this acts as a barrier and absorbs any excess moisture.
Achieving a Golden Top
For that gorgeous golden finish on your top crust, don’t skip the egg wash! Just brush a light layer of the beaten egg on the crust before baking. If you want to take it up a notch, sprinkle a little sanding sugar on top after the egg wash for a beautiful sparkle that adds a sweet crunch!
Cooling Time is Key
I know it’s tempting to dig in right away, but letting your pie cool for at least 3 hours is essential. This cooling time allows the filling to set, making for cleaner slices and a better texture. Plus, the flavors get to meld together beautifully during this time!
Using Fresh Ingredients
Always opt for fresh Granny Smith apples if you can! They not only provide the best flavor but also hold up well during baking. Avoid apples that are too soft or mealy, as they won’t give you that perfect bite. If you have a mix of tart and sweet apples, feel free to combine them for a more complex flavor profile!
Experiment with Spices
Don’t be afraid to play around with the spices! If you love cinnamon, add a little more, or try adding a hint of allspice or cardamom for a unique twist. Each variation brings out new flavors, making your pie even more special!
With these tips in hand, you’re well on your way to mastering the art of pie-making! Each pie you create will be a delicious reflection of your love for baking. Happy baking!
Storage & Reheating Instructions
Once you’ve enjoyed your delicious easy apple pie, you’ll want to know how to store those tempting leftovers properly. Trust me, the key to keeping that pie fresh lies in how you handle it after baking!
To store your pie, let it cool completely at room temperature first. This cooling step is super important because it helps the filling set and prevents condensation from forming, which can make the crust soggy. Once cool, cover the pie with plastic wrap or aluminum foil, or you can keep it in an airtight container. This will help keep the flavors intact and protect it from drying out in the fridge.
When stored properly, your easy apple pie can last in the refrigerator for about 3 to 4 days. Just remember to keep it covered to maintain that lovely flaky crust!
Now, when it comes to reheating, you want to do it just right to bring back that fresh-out-of-the-oven taste. Preheat your oven to 350°F (175°C) and place your pie on a baking sheet (to catch any drips!). Cover the pie loosely with aluminum foil to prevent the crust from browning too much. Heat it for about 15-20 minutes, or until it’s warmed through. If you like a crispy top, you can remove the foil for the last 5 minutes of reheating.
And if you’re in a hurry, the microwave can work in a pinch! Just pop a slice on a microwave-safe plate and heat it for about 30-45 seconds. But be careful not to overdo it, or you might end up with a chewy crust!
With these storage and reheating tips, you’ll be able to enjoy that mouthwatering easy apple pie for days to come. Each bite will remind you of the warmth and comfort of home!
FAQ About Easy Apple Pie
Got questions about making the perfect easy apple pie? I’ve got answers! Here are some of the most common queries I hear, along with my tips to help you out:
Can I use other types of apples?
Absolutely! While Granny Smith apples are my go-to for that perfect tartness, you can mix in other varieties like Honeycrisp or Fuji for a sweeter flavor. Just make sure to balance the sweetness by adjusting the sugar in the filling. A mix of sweet and tart apples can bring a lovely complexity to your pie!
How do I make a gluten-free version?
Making a gluten-free easy apple pie is totally doable! Simply substitute the all-purpose flour in your pie crust with a gluten-free flour blend. Many brands offer great options that work well in baking. Just keep in mind that you may need to adjust the liquid slightly since gluten-free flours can absorb moisture differently. Also, ensure that all your other ingredients are gluten-free, including the sanding sugar!
Can I freeze the pie?
You can definitely freeze your easy apple pie! If you want to freeze it before baking, assemble the pie as usual, then wrap it tightly in plastic wrap and foil to prevent freezer burn. When you’re ready to bake, take it out, let it sit in the fridge overnight, and bake it straight from the freezer, adding a few extra minutes to your baking time. If you have leftovers, just cool the pie completely first, then slice it and freeze individual pieces. They’ll be just as delightful when reheated!
If you have any more questions or need further tips, feel free to reach out! I love sharing the joy of baking with you!
Nutritional Information
When it comes to enjoying a slice of easy apple pie, it’s always good to know what you’re getting, right? Here’s an estimated breakdown of the nutritional values per slice (based on 8 slices total):
- Calories: 417
- Fat: 12g
- Saturated Fat: 4g
- Unsaturated Fat: 7g
- Trans Fat: 1g
- Cholesterol: 23mg
- Sodium: 189mg
- Carbohydrates: 77g
- Sugar: 46g
- Fiber: 6g
- Protein: 4g
These values are estimates and can vary based on specific ingredients used or portion sizes. But knowing these numbers can help you enjoy your pie a little more mindfully! So, slice up that delicious easy apple pie and savor every bite!
Final Thoughts
So there you have it – your very own easy apple pie recipe that’s not just delicious but also filled with warmth and nostalgia. I truly hope you give it a try and fill your home with that delightful aroma of baking apples and spices. There’s something so special about sharing a slice with loved ones, and I can’t wait for you to experience that joy!
I’d love to hear about your adventures in the kitchen! Did you try a different spice blend or maybe mix in some other apples? What did your family think? Please share your experiences in the comments below. Your stories inspire me and others looking to create their own delicious memories!
Remember, baking isn’t just about following a recipe; it’s about creating moments that last. So go ahead, embrace your inner baker, and let’s keep the tradition of homemade pies alive together!
For more recipes follow me in page Pinterest.
Print
Easy Apple Pie: 7 Secrets to Perfectly Crisp Deliciousness
- Total Time: 115 minutes
- Yield: 8 slices 1x
- Diet: Vegetarian
Description
This easy apple pie features a flaky crust and a sweet apple filling. It’s perfect for any occasion.
Ingredients
- 2 (9″) pie crusts
- 7 large Granny Smith apples (peeled, cored and sliced into ½ inch slices)
- ½ cup granulated sugar
- ½ cup light brown sugar (loosely packed)
- 2 tablespoons all-purpose flour
- 1 teaspoon ground cinnamon
- ⅛ teaspoon ground nutmeg
- 1 tablespoon lemon juice (plus the zest of half of a lemon)
- 1 large egg (lightly beaten in a small bowl for egg wash)
- 2 tablespoons sanding sugar (optional)
Instructions
- Prepare the pie crust according to your recipe or package directions.
- Place oven rack in the center position and preheat the oven to 400°F (204°C).
- In a large bowl, combine the sliced apples, granulated sugar, light brown sugar, flour, cinnamon, nutmeg, and lemon juice and zest; toss to coat evenly.
- Roll one disc of pie crust into a 12″ circle on a lightly floured surface.
- Lay the crust into the bottom of a deep dish pie plate.
- Spoon the apple filling over the bottom crust and discard the juices.
- Roll out the second disc of pie crust until it is ⅛” thick and lay it over the apple filling.
- Trim the dough along the edge of the pie plate and seal the edges.
- Cut 4 slits in the top of the dough to allow steam to vent.
- Brush the surface with egg wash and sprinkle with sanding sugar.
- Cover edges with a pie shield or foil for the first 25 minutes.
- Bake at 400°F (204°C) for 25 minutes.
- Remove the pie shield, turn the oven down to 375°F, and bake for an additional 30-35 minutes until golden brown.
- Cool at room temperature for at least 3 hours.
Notes
- Let the pie cool completely before serving for best results.
- Store leftovers in the refrigerator.
- Prep Time: 60 minutes
- Cook Time: 55 minutes
- Category: Dessert
- Method: Baking
- Cuisine: American
Nutrition
- Serving Size: 1 slice
- Calories: 417
- Sugar: 46g
- Sodium: 189mg
- Fat: 12g
- Saturated Fat: 4g
- Unsaturated Fat: 7g
- Trans Fat: 1g
- Carbohydrates: 77g
- Fiber: 6g
- Protein: 4g
- Cholesterol: 23mg
Keywords: Easy Apple Pie