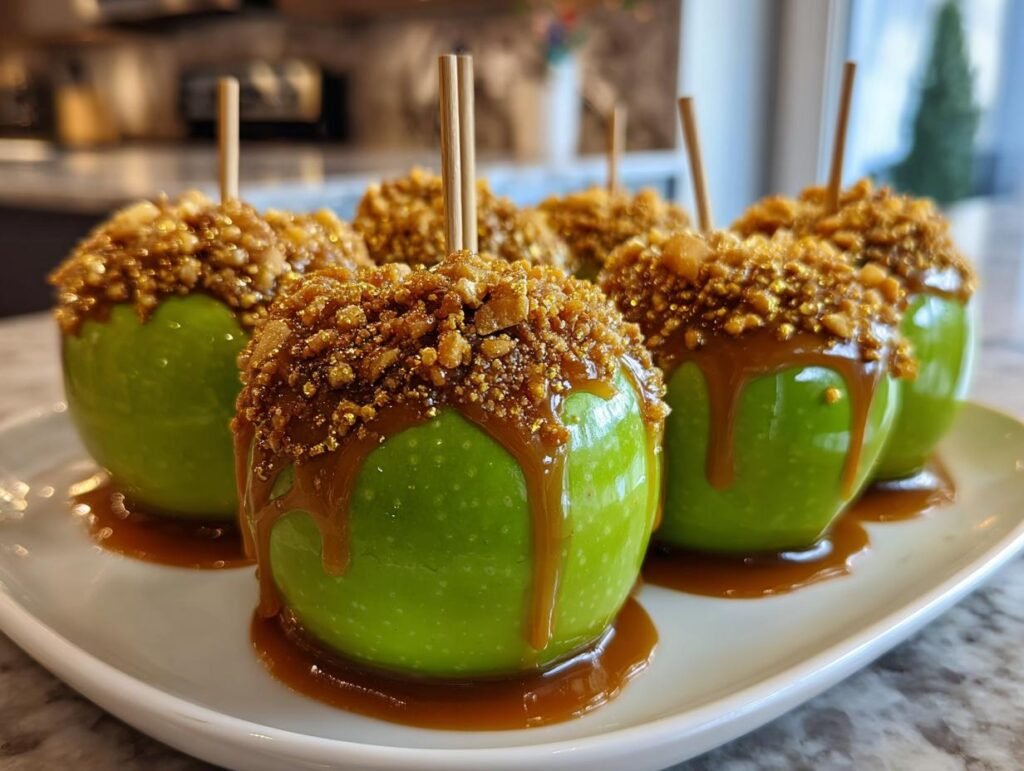
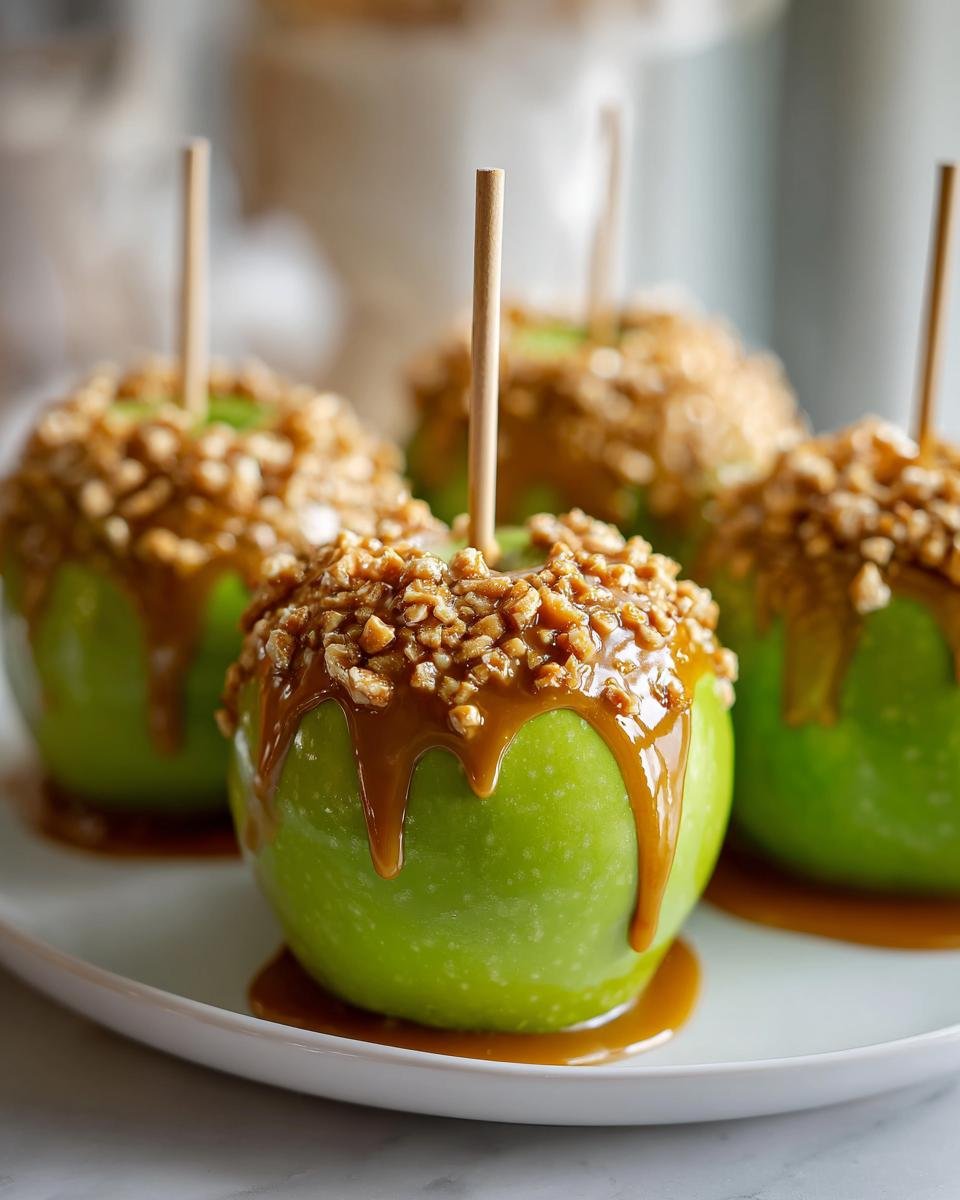
Ahh, caramel apples! They’re the classic fall treat that brings back so many sweet memories. There’s just something magical about biting into a crisp apple coated in rich, buttery caramel. It’s like a delicious hug for your taste buds! Whether you’re at a fall fair, a cozy bonfire, or just enjoying a crisp autumn day, these beauties are a must-have.
What I absolutely love about this recipe is how simple it is. You don’t need fancy equipment or skills to whip these up—just a few basic ingredients and a little bit of patience. And trust me, when you take that first bite, all the effort is totally worth it. It’s the perfect way to celebrate the season and indulge in a little sweetness! So, let’s dive into how to make these delightful caramel apples that will have everyone asking for seconds.
Ingredients List
Here’s everything you’ll need to create these scrumptious caramel apples. Gather these ingredients and let’s get started!
- 1/2 cup salted butter (1 stick)
- 2 cups granulated sugar
- 1 cup light corn syrup
- 14 oz evaporated milk, warmed
- 1 tsp vanilla extract
- 10–12 small/medium Granny Smith apples (or feel free to mix it up with Fuji, Gala, or McIntosh)
- 10–12 craft sticks
- Parchment paper for easy cleanup
Make sure to have everything ready before you dive in—it’s all about that smooth caramel action! You’ll be so glad you did when you see those shiny, delicious apples waiting to be devoured.
How to Prepare Instructions
Now that you’ve got all your ingredients ready, let’s get to the fun part—making those irresistible caramel apples! Follow these steps closely, and you’ll be on your way to caramel apple bliss in no time.
Prep the Apples
This step is super important for ensuring that the caramel sticks beautifully to your apples. First, remove the stems from the apples; they just get in the way. Give each apple a good rinse under hot water to remove any wax or residue—trust me, this makes a big difference! After rinsing, scrub them dry with a clean towel. Next, pop those beauties in the fridge for about 30 minutes. Chilling them helps the caramel set faster, which means less waiting and more munching!
Make the Caramel
Now, let’s whip up some delicious caramel! In a medium saucepan over medium heat, combine your salted butter, granulated sugar, and light corn syrup. Stir it all together as it starts to melt; you want the mixture to come to a gentle boil. Once it’s bubbling, grab your warmed evaporated milk and slowly pour it in, stirring continuously. This part is crucial—keep an eye on the temperature! You’re aiming for 235–240°F on a candy thermometer. When it reaches that sweet spot, take it off the heat and stir in the vanilla extract. Oh, the smell is heavenly!
Dip the Apples
Once your caramel is ready, it’s time to dip! First, make sure your apples are nice and dry. Insert the craft sticks into the top of each apple, pushing them in about halfway. Holding the apple by the stick, dip it into the warm caramel, swirling it around to coat it evenly. Let the excess caramel drip off before placing the apple on a sheet of parchment paper. Repeat with the rest of your apples, then pop them in the fridge for about 30 minutes to let that delicious caramel set.
Add Toppings (Optional)
If you’re feeling adventurous, now’s the time to add some fun toppings! While the caramel is still warm, sprinkle on crushed candy like M&Ms or nuts for some extra crunch. If you prefer a chocolate drizzle, wait until the caramel has set, then melt some chocolate and drizzle it over the top. The combination of flavors is just divine!
Store
Once the caramel apples are fully set, you can store them in the fridge for up to two weeks. Just be sure to keep them in an airtight container to maintain that glorious caramel coating. Trust me, they won’t last long once you share them with family and friends!
Why You’ll Love This Recipe
- Quick and Easy: You’ll be amazed at how fast you can whip these up! With a prep and cook time of just about an hour, you’ll have a delicious treat ready in no time.
- Delicious Flavor: The combination of sweet, buttery caramel with crisp, tart apples is simply irresistible. Each bite is a delightful explosion of flavors that’ll leave you craving more!
- Customizable Toppings: Get creative! You can add whatever toppings you like—crushed candy, nuts, chocolate drizzle, or even sprinkles. The possibilities are endless, and each apple can be uniquely yours!
- Perfect for Sharing: These caramel apples are perfect for gatherings, parties, or just a cozy night in. Everyone loves them, and they make for a fun, interactive treat!
- Fall Favorite: There’s just something about caramel apples that screams autumn! They evoke memories of fall fairs, hayrides, and family gatherings, making them the perfect seasonal indulgence.
Tips for Success
Now that you’re well on your way to making these delightful caramel apples, I want to share some of my best tips to ensure they turn out perfectly every time. Trust me, these little nuggets of wisdom can make all the difference!
- Use Fresh Apples: Always choose fresh, firm apples for the best results. Granny Smith apples are my go-to because their tartness balances the sweetness of the caramel beautifully. Make sure they’re free from any blemishes or soft spots!
- Remove the Wax: Many store-bought apples have a wax coating that can prevent the caramel from sticking. A good rinse under hot water does wonders! Scrubbing gently with a cloth helps remove any residual wax, ensuring your caramel adheres perfectly.
- Keep Everything Dry: Moisture is the enemy of caramel! Make sure your apples are completely dry before dipping, and don’t forget to let that excess caramel drip off before placing them on the parchment paper. This helps avoid a sticky mess.
- Temperature Matters: Pay close attention to the temperature of your caramel. Too hot, and it’ll burn; too cool, and it won’t coat the apples properly. Using a candy thermometer is the best way to nail that sweet spot between 235–240°F!
- Work Quickly: Once your caramel is ready, you’ll want to dip the apples while it’s still warm. Caramel can cool down quickly, so don’t dawdle! Have your apples prepped and ready to go for a smooth dipping process.
- Experiment with Toppings: Don’t be afraid to get creative! Chocolate, chopped nuts, sprinkles, or even a dash of sea salt can elevate your caramel apples to the next level. Just remember to add toppings while the caramel is still warm for the best adhesion.
- Store Properly: If you have leftovers (which is rare, trust me!), make sure to store them in an airtight container in the fridge. This keeps them fresh and prevents the caramel from becoming sticky or losing its shine.
With these tips under your belt, you’re ready to tackle caramel apples like a pro! Remember, it’s all about patience and practice. So roll up your sleeves and get ready for some sweet success!
Variations
Now that you’ve mastered the classic caramel apple, let’s have some fun with variations! There are so many ways to put your own spin on this delightful treat, and I’m excited to share some ideas that will make your caramel apples even more delicious!
Try Different Apple Varieties
While Granny Smith apples are a fantastic choice for their tartness, don’t be afraid to mix it up with other varieties! Fuji apples are super sweet and juicy, while Gala apples bring a lovely floral note to the party. You could even use McIntosh for a softer texture or Honeycrisp for that perfect balance of sweetness and crunch. Each type of apple will give your caramel apples a unique flavor profile!
Spice Up Your Caramel
Add a little twist to your caramel by incorporating spices! A dash of cinnamon or nutmeg can elevate the flavor and give it that cozy fall vibe. Just sprinkle in a teaspoon or so while you’re cooking the caramel—trust me, the warmth of those spices will make your kitchen smell heavenly!
Go for Gourmet Toppings
If you want to take your caramel apples to the next level, think about some gourmet toppings! Drizzle with melted dark or white chocolate for a rich finish, or sprinkle on crushed pretzels for that perfect sweet-and-salty combo. You could also try using toasted coconut, crushed graham crackers, or even a sprinkle of Heath bar pieces for a bit of crunch and sweetness!
Dip in Flavorful Chocolate
Why not dip your apples in flavored chocolate? You can melt some chocolate and mix in a bit of almond or peppermint extract for a fun twist. Chocolate-covered caramel apples are a classic, but adding that extra flavor makes them irresistible!
Make Them Mini
For a fun party idea, consider making mini caramel apples! Use smaller apples, like crab apples, and dip them in caramel for bite-sized delights. They’re perfect for sharing and make a cute addition to any dessert table.
With all these variations, the possibilities are endless! You can really let your creativity shine and make each batch of caramel apples unique. So grab your apples, get dipping, and enjoy the process of experimenting with flavors and toppings!
Nutritional Information Section
Curious about what’s in your delicious caramel apples? Here’s a rough estimate of the nutritional information per apple. Keep in mind that these values can vary based on the size of the apple and any toppings you choose to add, but this will give you a good idea of what to expect!
- Calories: 182
- Fat: 5g
- Saturated Fat: 3g
- Unsaturated Fat: 2g
- Trans Fat: 0g
- Sodium: 95mg
- Sugar: 35g
- Carbohydrates: 35g
- Fiber: 1g
- Protein: 1g
- Cholesterol: 15mg
These numbers remind me that while caramel apples are a delightful treat, moderation is key! Enjoy them as a special indulgence, especially during those cozy fall days. Happy eating!
FAQ Section
Got questions about making caramel apples? No worries! I’ve collected some of the most common queries and answered them to help you out. Let’s dive in!
Can I use different types of apples?
Absolutely! While Granny Smith apples are my favorite for their tartness, you can definitely experiment with other varieties. Fuji, Gala, and McIntosh all work beautifully. Each type of apple brings its own unique flavor, so don’t be afraid to mix and match!
Do I need to remove the wax from the apples?
Yes, removing the wax is super important! Most store-bought apples have a wax coating that can prevent the caramel from sticking properly. Just rinse them under hot water and scrub gently with a cloth to ensure a good surface for the caramel to adhere to.
How do I store leftover caramel apples?
If you manage to have any leftovers (which is rare!), store them in an airtight container in the fridge. They’ll stay fresh for up to two weeks. Just make sure they’re not touching each other, so the caramel coating doesn’t get messed up!
Can I make these caramel apples ahead of time?
Definitely! You can make them a day or two in advance. Just store them properly in the fridge, and they’ll be ready to impress your friends and family whenever you need them. Just remember, the sooner you eat them, the fresher they’ll taste!
What should I do if the caramel is too thick or too thin?
If your caramel is too thick, you can try adding a little bit of warm water or milk to thin it out. Just do this gradually while stirring until you reach your desired consistency. If it’s too thin, let it cook a bit longer to reach that perfect coating texture. Remember, patience is key!
Can I use store-bought caramel instead of making my own?
Of course! If you’re short on time, using store-bought caramel is a great shortcut. Just melt it according to the package instructions, and you can still create delicious caramel apples. Just remember that homemade caramel has that extra special touch!
If you have any more questions or need tips, feel free to reach out! I’m always here to help you create the most amazing caramel apples. Happy dipping!
What to Do Next
Now that you’ve made your delicious caramel apples, I’d love to hear all about your experience! Did you try any fun toppings or variations? Please share your thoughts in the comments below. I can’t wait to read all about your caramel apple adventures!
If you enjoyed this recipe, give it a rating! Your feedback helps me bring you more sweet treats and tips. And don’t forget to share your own creations with friends and family—there’s nothing quite like the joy of making and enjoying caramel apples together!
For more recipes follow me in page Pinterest.
Happy dipping, and may your fall be filled with sweetness and smiles!
Print
How to make Caramel Apples That Spark Joy This Fall
- Total Time: 1 hour
- Yield: 10–12 caramel apples 1x
- Diet: Vegetarian
Description
Learn how to make delicious caramel apples with this simple recipe.
Ingredients
- 1/2 cup salted butter (1 stick)
- 2 cups granulated sugar
- 1 cup light corn syrup
- 14 oz evaporated milk, warmed
- 1 tsp vanilla extract
- 10–12 small/medium Granny Smith apples (or Fuji, Gala, McIntosh)
- 10–12 craft sticks
- Parchment paper
Instructions
- Prep the apples: Remove stems, rinse apples under hot water, scrub dry, and chill in the fridge.
- Make the caramel: In a saucepan, combine butter, sugar, and corn syrup. Boil, add warmed evaporated milk gradually, and cook until it reaches 235–240°F. Stir in vanilla.
- Dip the apples: Dry apples, insert sticks, dip in caramel, and place on parchment. Refrigerate to set.
- Add toppings (optional): Add crushed candy while caramel is warm or drizzle chocolate after caramel sets.
- Store: Refrigerate apples for up to 2 weeks.
Notes
- Warming the milk helps maintain caramel temperature.
- Cold apples help the caramel set faster.
- Removing wax is essential for caramel adherence.
- Prep Time: 30 minutes
- Cook Time: 30 minutes
- Category: Dessert
- Method: Stovetop
- Cuisine: American
Nutrition
- Serving Size: 1 apple
- Calories: 182
- Sugar: 35g
- Sodium: 95mg
- Fat: 5g
- Saturated Fat: 3g
- Unsaturated Fat: 2g
- Trans Fat: 0g
- Carbohydrates: 35g
- Fiber: 1g
- Protein: 1g
- Cholesterol: 15mg
Keywords: Caramel Apples, Dessert, Fall Treats