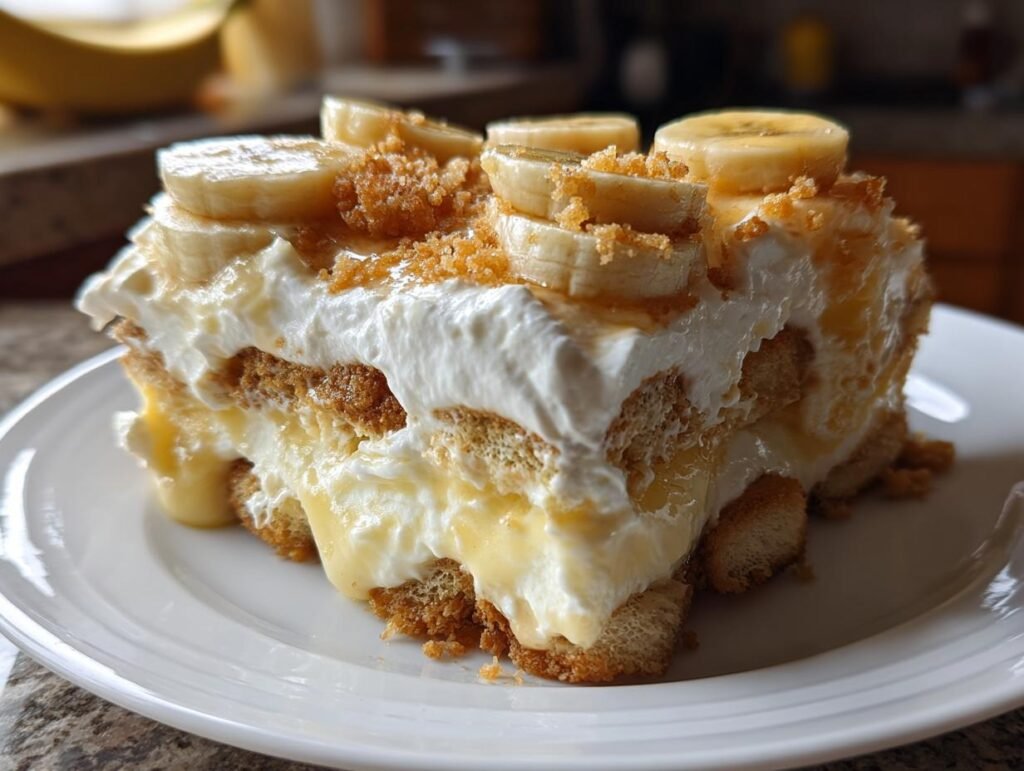
Oh, let me tell you about my absolute favorite dessert: Old-Fashioned Homemade Banana Pudding! This classic treat brings back such warm memories of family gatherings and lazy Sunday afternoons. You know, the kind of dessert that just feels like a big hug? There’s something so comforting about creamy, dreamy pudding layered with ripe bananas and crunchy vanilla wafers. It’s like a sweet symphony of flavors and textures that dances on your palate!
Every time I make this pudding, I’m reminded of my grandmother’s kitchen, filled with laughter and the smell of vanilla wafting through the air. It’s amazing how a simple dessert can evoke such feelings of nostalgia. You can’t help but smile when you see those layers of goodness! Whether it’s a birthday celebration or just a regular Tuesday, this banana pudding has the magical ability to make any moment feel special. Trust me, once you make it, you’ll understand why it holds such a cherished place in my heart!
Ingredients for Old-Fashioned Homemade Banana Pudding
Here’s what you’ll need to whip up this delightful dessert! Gather these ingredients, and let’s get started:
- ¾ cup granulated sugar
- ¼ cup all-purpose flour
- ¼ teaspoon salt
- 3 cups milk
- 3 large eggs
- 2 teaspoons vanilla extract
- 1 box (about 8 oz) vanilla wafers
- 4 ripe bananas, sliced
Make sure those bananas are nice and ripe—trust me, it makes all the difference in sweetness and flavor. And don’t forget to have fun with it; these ingredients are the foundation for a dessert that’s sure to bring everyone together!
How to Prepare Old-Fashioned Homemade Banana Pudding
Alright, let’s dive into the delightful process of making this creamy goodness! I promise, it’s easier than you might think, and the end result is just heavenly.
Step 1: Prepare the Pudding Base
First things first, grab a medium saucepan and whisk together the ¾ cup of sugar, ¼ cup of all-purpose flour, and ¼ teaspoon of salt. This is where the magic begins! Slowly whisk in 3 cups of milk until everything is well combined. Now, place the saucepan over medium heat. Keep stirring constantly—don’t walk away! You want to ensure it thickens without sticking to the bottom. After about 5-7 minutes, you’ll notice it getting bubbly and thick. Once it reaches that stage, reduce the heat to low and let it cook for 2 more minutes while stirring. This is when your pudding base becomes rich and creamy!
Step 2: Temper the Eggs
Now, let’s get those eggs ready. In a small bowl, whisk together 3 large eggs. Here’s the crucial part: you need to temper those eggs to avoid scrambling! Slowly pour a small amount of the hot milk mixture into the eggs while whisking continuously. This gradual process raises the temperature of the eggs, so they blend smoothly into the pudding. Once that’s done, pour the egg mixture back into the saucepan with the rest of the pudding. Return it to medium heat, stirring gently until it just begins to boil again, which should take about 2 minutes. Then stir in 2 teaspoons of vanilla extract and remove it from heat. Let it cool for about 15 minutes, stirring occasionally to avoid a skin forming on top.
Step 3: Layering the Ingredients
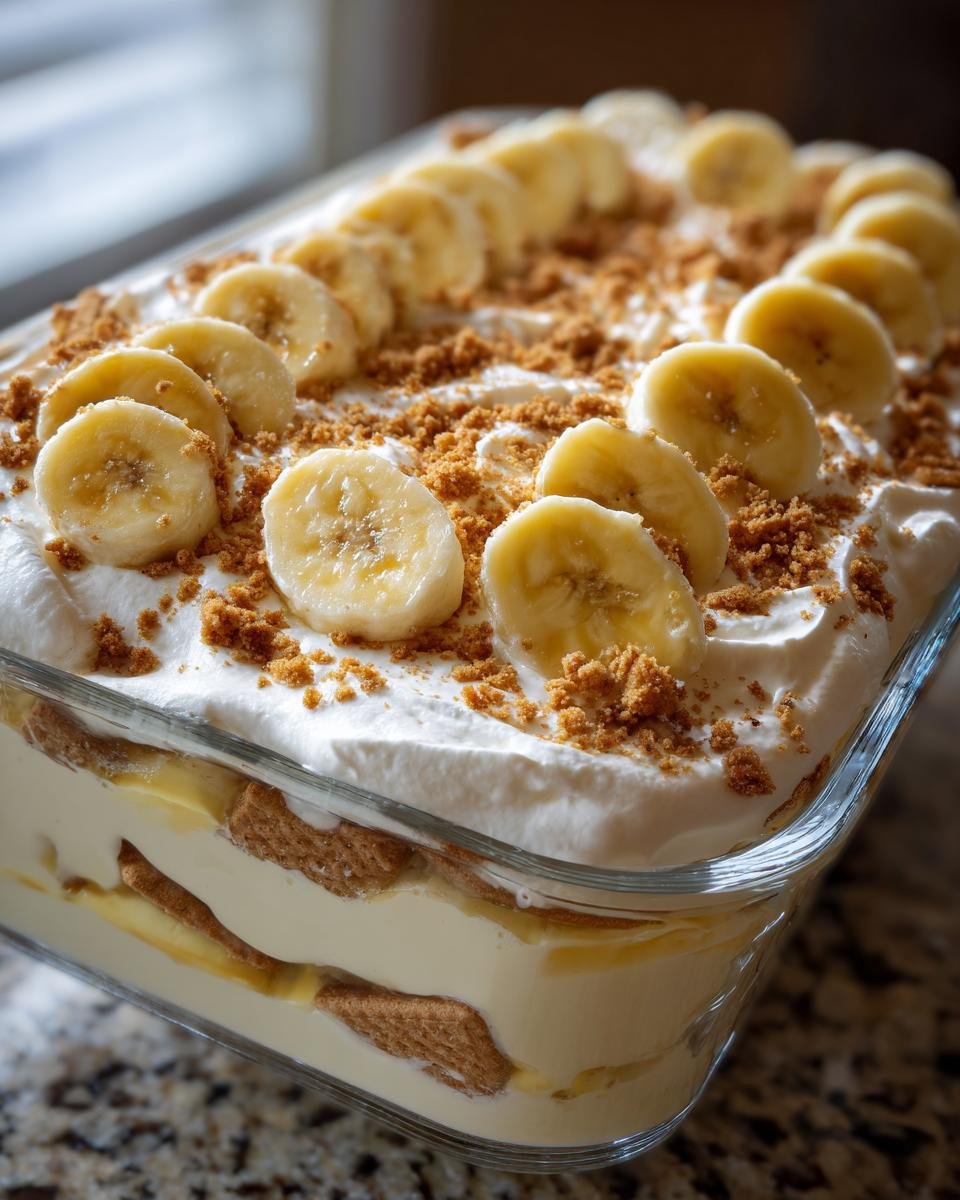
Now it’s time to create those beautiful layers! In an ungreased 8-inch square dish, start by placing a layer of about 25 vanilla wafers on the bottom. Next, add half of the sliced 4 ripe bananas on top of the wafers. Pour half of that luscious pudding over the bananas, making sure to cover them well. Repeat this process with another layer of wafers, the remaining banana slices, and finish with the rest of the pudding on top. You want all those delicious layers to shine!
Step 4: Chilling the Pudding
Once your masterpiece is assembled, cover the dish with plastic wrap and pop it into the refrigerator. This is an important step—let it chill for at least 4 hours, but overnight is even better! Chilling allows all the flavors to meld beautifully, making each bite even more delightful. Trust me, the wait is worth it!
Tips for Success with Old-Fashioned Homemade Banana Pudding
Let me share some of my best tips to ensure your Old-Fashioned Homemade Banana Pudding turns out absolutely perfect! You’ll want to keep these in mind as you whip up this delightful dessert.
Use Ripe Bananas
This might seem like a no-brainer, but trust me, using ripe bananas is key! Look for bananas that are speckled with brown spots; they’re the sweetest and will add that rich flavor to your pudding. Avoid using green bananas, as they’ll leave your pudding tasting a bit starchy. Ripe bananas give that perfect creamy texture you’re after!
Chill Overnight for Best Flavor
While you can technically enjoy your pudding after a few hours, I really recommend letting it chill overnight if you can. This time allows all those incredible flavors to meld together beautifully, creating a dessert that’s even more delicious. Plus, the longer it sits, the creamier it gets. Trust me, patience pays off!
Prevent Browning of Banana Slices
To keep those gorgeous banana slices looking fresh and vibrant, consider tossing them lightly in a bit of lemon juice before layering them into the pudding. The acidity helps prevent browning and keeps your dessert looking as appetizing as it tastes. Just a little squeeze goes a long way!
Layer Wisely
When layering your pudding, make sure to cover the bananas well with the pudding to protect them from air exposure. This not only keeps them from browning but also allows the flavors to soak into the wafers, making each bite even more scrumptious!
With these simple tips, you’ll be well on your way to impressing your family and friends with your Old-Fashioned Homemade Banana Pudding. Enjoy the process, and don’t be afraid to put your own spin on it! Happy pudding-making!
Nutritional Information for Old-Fashioned Homemade Banana Pudding
Now, let’s talk about the nutritional side of this delightful dessert! Understanding what’s in your food can make enjoying it even sweeter. Here’s a breakdown of the typical nutritional values per serving of Old-Fashioned Homemade Banana Pudding, keeping in mind that these values are estimates based on standard ingredients:
- Calories: 221 kcal
- Sugar: 31 g
- Fat: 5 g
- Saturated Fat: 2 g
- Protein: 6 g
- Carbohydrates: 40 g
- Fiber: 2 g
- Cholesterol: 72 mg
- Sodium: 132 mg
These numbers give you a good idea of what to expect in each delicious serving. Remember, while it’s a treat, it’s always nice to know what you’re indulging in. Enjoy every creamy, sweet bite of your homemade banana pudding, guilt-free!
Variations on Old-Fashioned Homemade Banana Pudding
Old-Fashioned Homemade Banana Pudding is already a star, but there are so many fun ways to mix things up and put your own spin on it! For starters, consider swapping out the classic vanilla wafers for chocolate wafers or even graham crackers. The chocolate adds a rich twist that pairs beautifully with the bananas!
If you’re feeling adventurous, why not layer in some chocolate pudding alongside the vanilla? It creates a delightful contrast that chocolate lovers will adore. You can also sprinkle in some chopped nuts like pecans or walnuts for a satisfying crunch that complements the creamy texture.
And for a touch of tropical flair, try adding coconut flakes or even a layer of pineapple slices. These variations not only elevate the taste but also add a fun visual appeal. So, go ahead and get creative with your banana pudding—each twist will make it feel like a brand-new dessert!
Serving Suggestions for Old-Fashioned Homemade Banana Pudding
When it comes to serving Old-Fashioned Homemade Banana Pudding, the options are as delightful as the dessert itself! For a classic touch, consider topping each serving with a generous dollop of whipped cream—it adds a light and airy finish that complements the creamy pudding perfectly. If you want a fruity twist, a medley of fresh berries like strawberries or blueberries on the side can add a burst of flavor and color. And for those extra special occasions, serve it alongside a scoop of vanilla ice cream for an indulgent treat that’s simply irresistible. Enjoy every spoonful!
Frequently Asked Questions about Old-Fashioned Homemade Banana Pudding
Got questions about making Old-Fashioned Homemade Banana Pudding? Don’t worry, I’ve got you covered! Here are some common queries and answers to help you navigate this delicious dessert.
How do I store leftovers?
To keep your banana pudding fresh and delicious, cover it tightly with plastic wrap or transfer it to an airtight container. It’s best stored in the refrigerator to maintain its creamy texture. Just make sure to enjoy it within 3-4 days, as the bananas can start to brown over time.
Can I make this pudding in advance?
Absolutely! In fact, making Old-Fashioned Homemade Banana Pudding a day ahead is a fantastic idea. Letting it chill overnight allows all those wonderful flavors to blend together, resulting in an even tastier dessert. Just remember to cover it well to keep it fresh!
Will the bananas turn brown in the pudding?
It can happen, but there’s a simple trick to help prevent that browning. Toss the banana slices lightly in lemon juice before layering them into the pudding. The acidity helps keep them looking fresh and vibrant while still tasting sweet!
Can I freeze banana pudding?
Freezing isn’t the best option for Old-Fashioned Homemade Banana Pudding because the texture can change once thawed. The pudding may become grainy, and the bananas will not hold up well in the freezer. It’s best enjoyed fresh or stored in the fridge.
What can I do if my pudding is too thin?
If you find your pudding isn’t thickening as it should, make sure you’re cooking it long enough and stirring constantly. If it’s still a bit runny after cooling, you can gently heat it again and whisk in a cornstarch slurry (1 tablespoon cornstarch mixed with 1 tablespoon water) until it thickens. Just remember to be patient; it will come together!
For more recipes follow me in page Pinterest.
With these FAQs in mind, you’re all set to tackle any challenges that come your way while making Old-Fashioned Homemade Banana Pudding. Happy cooking!
Print
Old-Fashioned Homemade Banana Pudding: 7 Sweet Secrets Revealed
- Total Time: 4 hours 45 minutes
- Yield: 8 servings 1x
- Diet: Vegetarian
Description
Old-Fashioned Homemade Banana Pudding is a classic dessert that combines creamy pudding, ripe bananas, and crunchy vanilla wafers.
Ingredients
- ¾ cup sugar
- ¼ cup all-purpose flour
- ¼ teaspoon salt
- 3 cups milk
- 3 eggs
- 2 teaspoons vanilla extract
- 1 box vanilla wafers (about 8 oz)
- 4 bananas, sliced
Instructions
- In a saucepan, whisk together the sugar, flour, and salt. Gradually whisk in the milk.
- Cook over medium heat, stirring constantly, until the mixture becomes thick and bubbly. Reduce the heat to low and cook for 2 more minutes.
- Remove the saucepan from heat. In a small bowl, whisk the eggs. Slowly add a small amount of the hot milk mixture into the eggs while whisking to prevent curdling.
- Pour the egg mixture back into the saucepan. Return to heat and cook until a gentle boil begins, about 2 minutes. Stir in the vanilla extract, remove from heat, and let cool for 15 minutes, stirring occasionally.
- In an ungreased 8-inch square dish, place a layer of about 25 vanilla wafers, followed by half of the banana slices.
- Pour half of the pudding over the bananas.
- Repeat the layers once more, finishing with pudding on top.
- Cover with plastic wrap and refrigerate for at least 4 hours, preferably overnight.
- Before serving, crush the remaining vanilla wafers and sprinkle over the top. Serve chilled.
Notes
- Chilling the pudding overnight enhances the flavor.
- Use ripe bananas for better sweetness.
- Prep Time: 30 minutes
- Cook Time: 15 minutes
- Category: Dessert
- Method: Stovetop
- Cuisine: American
Nutrition
- Serving Size: 1 serving
- Calories: 221 kcal
- Sugar: 31 g
- Sodium: 132 mg
- Fat: 5 g
- Saturated Fat: 2 g
- Carbohydrates: 40 g
- Fiber: 2 g
- Protein: 6 g
- Cholesterol: 72 mg
Keywords: Old-Fashioned Homemade Banana Pudding, Banana Pudding, Classic Dessert